Compiling for Windows
Requirements
For compiling under Windows, the following is required:
A C++ compiler. Use one of the following:
- Visual Studio Community,
version 2019 or later. Visual Studio 2022 is recommended.
Make sure to enable C++ in the list of workflows to install.
If you've already installed Visual Studio without C++ support, run the installer
again; it should present you a Modify button.
Supports
x86_64,x86_32, andarm64. - MinGW-w64 with GCC can be used as an alternative to
Visual Studio. Be sure to install/configure it to use the
posixthread model. Important: When using MinGW to compile themasterbranch, you need GCC 9 or later. Supportsx86_64andx86_32only. - MinGW-LLVM with clang can be used as
an alternative to Visual Studio and MinGW-w64.
Supports
x86_64,x86_32, andarm64.
- Visual Studio Community,
version 2019 or later. Visual Studio 2022 is recommended.
Make sure to enable C++ in the list of workflows to install.
If you've already installed Visual Studio without C++ support, run the installer
again; it should present you a Modify button.
Supports
Python 3.8+. Make sure to enable the option to add Python to the
PATHin the installer.SCons 4.0+ build system. Using the latest release is recommended, especially for proper support of recent Visual Studio releases.
Setting up SCons
To install SCons, open the command prompt and run the following command
python -m pip install scons
If you are prompted with the message
Defaulting to user installation because normal site-packages is not writeable, you may have to run that command again using elevated
permissions. Open a new command prompt as an Administrator then run the command
again to ensure that SCons is available from the PATH.
To check whether you have installed Python and SCons correctly, you can
type python --version and scons --version into a command prompt
(cmd.exe).
If the commands above don't work, make sure to add Python to your PATH
environment variable after installing it, then check again.
You can do so by running the Python installer again and enabling the option
to add Python to the PATH.
If SCons cannot detect your Visual Studio installation, it might be that your
SCons version is too old. Update it to the latest version with
python -m pip install --upgrade scons.
Downloading Redot's source
Refer to Getting Source for detailed instructions.
The tutorial will assume from now on that you placed the source code in
C:\Redot.
Compiling
Selecting a compiler
SCons will automatically find and use an existing Visual Studio installation.
If you do not have Visual Studio installed, it will attempt to use
MinGW instead. If you already have Visual Studio installed and want to
use MinGW-w64, pass use_mingw=yes to the SCons command line. Note that MSVC
builds cannot be performed from the MSYS2 or MinGW shells. Use either
cmd.exe or PowerShell instead. If you are using MinGW-LLVM, pass both
use_mingw=yes and use_llvm=yes to the SCons command line.
Running SCons
After opening a command prompt, change to the root directory of
the engine source code (using cd) and type:
C:\Redot> scons platform=windows
If all goes well, the resulting binary executable will be placed in
C:\Redot\bin\ with the name Redot.windows.editor.x86_32.exe or
Redot.windows.editor.x86_64.exe. By default, SCons will build a binary matching
your CPU architecture, but this can be overridden using arch=x86_64,
arch=x86_32, or arch=arm64.
This executable file contains the whole engine and runs without any dependencies. Running it will bring up the Project Manager.
Compiling with support for Direct3D 12
By default, builds of Redot do not contain support for the Direct3D 12 graphics API.
You can install the required dependencies by running
python misc/scripts/install_d3d12_sdk_windows.py
in the Redot source repository. After running this script, add the d3d12=yes
SCons option to enable Direct3D 12 support. This will use the default paths for
the various dependencies, which match the ones used in the script.
You can find the detailed steps below if you wish to set up dependencies manually, but the above script handles everything for you (including the optional PIX and Agility SDK components).
- godot-nir-static library. We compile the Mesa libraries you will need into a static library. Download it anywhere, unzip it and remember the path to the unzipped folder, you will need it below.
Optionally, you can compile with the following for additional features:
- PIX is a performance tuning and debugging application for Direct3D12 applications. If you compile-in support for it, you can get much more detailed information through PIX that will help you optimize your game and troubleshoot graphics bugs. To use it, download the WinPixEventRuntime package. You will be taken to a NuGet package page where you can click "Download package" to get it. Once downloaded, change the file extension to .zip and unzip the file to some path.
- Agility SDK can be used to provide access to the latest Direct3D 12 features without relying on driver updates. To use it, download the latest Agility SDK package. You will be taken to a NuGet package page where you can click "Download package" to get it. Once downloaded, change the file extension to .zip and unzip the file to some path.
When building Redot, you will need to tell SCons to use Direct3D 12 and where to look for the additional libraries:
C:\Redot> scons platform=windows d3d12=yes mesa_libs=<...>
Or, with all options enabled:
C:\Redot> scons platform=windows d3d12=yes mesa_libs=<...> agility_sdk_path=<...> pix_path=<...>
Compiling with ANGLE support
ANGLE provides a translation layer from OpenGL ES 3.x to Direct3D 11 and can be used to improve support for the Compatibility renderer on some older GPUs with outdated OpenGL drivers and on Windows for ARM.
By default, Redot is built with dynamically linked ANGLE, you can use it by placing
libEGL.dll and libGLESv2.dll alongside the executable.
To compile Redot with statically linked ANGLE:
- Download pre-built static libraries from godot-nir-static library, and unzip them.
- When building Redot, add
angle_libs={path}to tell SCons where to look for the ANGLE libraries
scons platform=windows angle_libs=<...>
Development in Visual Studio
Using an IDE is not required to compile Redot, as SCons takes care of everything. But if you intend to do engine development or debugging of the engine's C++ code, you may be interested in configuring a code editor or an IDE.
Folder-based editors don't require any particular setup to start working with Redot's codebase. To edit projects with Visual Studio they need to be set up as a solution.
You can create a Visual Studio solution via SCons by running SCons with
the vsproj=yes parameter, like this
scons platform=windows vsproj=yes
You will be able to open Redot's source in a Visual Studio solution now, and able to build Redot using Visual Studio's Build button.
Cross-compiling for Windows from other operating systems
If you are a Linux or macOS user, you need to install MinGW-w64, which typically comes in 32-bit and 64-bit variants, or MinGW-LLVM, which comes as a single archive for all target architectures. The package names may differ based on your distribution, here are some known ones:
| Arch Linux | pacman -Sy mingw-w64 |
|---|---|
| Debian / Ubuntu | apt install mingw-w64 |
| Fedora | dnf install mingw64-gcc-c++ mingw64-winpthreads-static \ mingw32-gcc-c++ mingw32-winpthreads-static |
| macOS | brew install mingw-w64 |
| Mageia | urpmi mingw64-gcc-c++ mingw64-winpthreads-static \ mingw32-gcc-c++ mingw32-winpthreads-static |
Before attempting the compilation, SCons will check for
the following binaries in your PATH environment variable
# for MinGW-w64
i686-w64-mingw32-gcc
x86_64-w64-mingw32-gcc

# for MinGW-LLVM
aarch64-w64-mingw32-clang
i686-w64-mingw32-clang
x86_64-w64-mingw32-clang
If the binaries are not located in the PATH (e.g. /usr/bin),
you can define the following environment variable to give a hint to
the build system
export MINGW_PREFIX="/path/to/mingw"
Where /path/to/mingw is the path containing the bin directory where
i686-w64-mingw32-gcc and x86_64-w64-mingw32-gcc are located (e.g.
/opt/mingw-w64 if the binaries are located in /opt/mingw-w64/bin).
To make sure you are doing things correctly, executing the following in the shell should result in a working compiler (the version output may differ based on your system)
${MINGW_PREFIX}/bin/x86_64-w64-mingw32-gcc --version
# x86_64-w64-mingw32-gcc (GCC) 13.2.0
Troubleshooting
Cross-compiling from some Ubuntu versions may lead to this bug, due to a default configuration lacking support for POSIX threading.
You can change that configuration following those instructions, for 64-bit
sudo update-alternatives --config x86_64-w64-mingw32-gcc
<choose x86_64-w64-mingw32-gcc-posix from the list>
sudo update-alternatives --config x86_64-w64-mingw32-g++
<choose x86_64-w64-mingw32-g++-posix from the list>
And for 32-bit
sudo update-alternatives --config i686-w64-mingw32-gcc
<choose i686-w64-mingw32-gcc-posix from the list>
sudo update-alternatives --config i686-w64-mingw32-g++
<choose i686-w64-mingw32-g++-posix from the list>
Creating Windows export templates
Windows export templates are created by compiling Redot without the editor, with the following flags:
C:\Redot> scons platform=windows target=template_debug arch=x86_32
C:\Redot> scons platform=windows target=template_release arch=x86_32
C:\Redot> scons platform=windows target=template_debug arch=x86_64
C:\Redot> scons platform=windows target=template_release arch=x86_64
C:\Redot> scons platform=windows target=template_debug arch=arm64
C:\Redot> scons platform=windows target=template_release arch=arm64
If you plan on replacing the standard export templates, copy these to the
following location, replacing <version> with the version identifier
(such as 4.2.1.stable or 4.3.dev):
%APPDATA%\Redot\export_templates\<version>\
With the following names
windows_debug_x86_32_console.exe
windows_debug_x86_32.exe
windows_debug_x86_64_console.exe
windows_debug_x86_64.exe
windows_debug_arm64_console.exe
windows_debug_arm64.exe
windows_release_x86_32_console.exe
windows_release_x86_32.exe
windows_release_x86_64_console.exe
windows_release_x86_64.exe
windows_release_arm64_console.exe
windows_release_arm64.exe
However, if you are using custom modules or custom engine code, you may instead want to configure your binaries as custom export templates here:
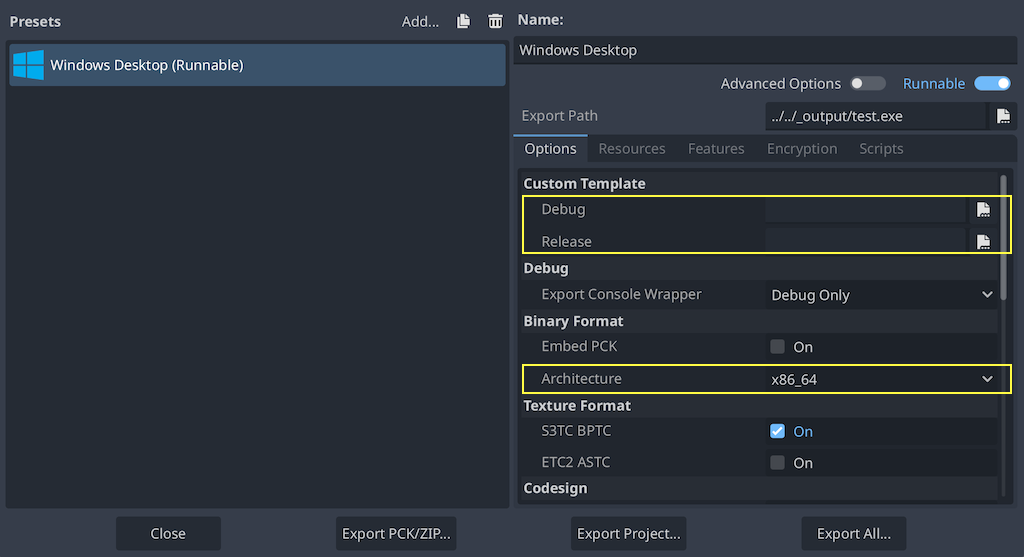
Select matching architecture in the export config.
You don't need to copy them in this case, just reference the resulting
files in the bin\ directory of your Redot source folder, so the next
time you build, you will automatically have the custom templates referenced.