Compiling for Linux, *BSD
Requirements
For compiling under Linux or other Unix variants, the following is required:
GCC 9+ or Clang 6+.
SCons 4.0+ build system.
pkg-config (used to detect the development libraries listed below).
Development libraries:
- X11, Xcursor, Xinerama, Xi and XRandR.
- Wayland and wayland-scanner.
- Mesa.
- ALSA.
- PulseAudio.
Optional - libudev (build with
udev=yes).
Distro-specific one-liners
apk add
scons
pkgconf
gcc
g++
libx11-dev
libxcursor-dev
libxinerama-dev
libxi-dev
libxrandr-dev
mesa-dev
eudev-dev
alsa-lib-dev
pulseaudio-dev
pacman -Sy --noconfirm --needed
scons
pkgconf
gcc
libxcursor
libxinerama
libxi
libxrandr
wayland-utils
mesa
glu
libglvnd
alsa-lib
pulseaudio
sudo apt-get update
sudo apt-get install -y
build-essential
scons
pkg-config
libx11-dev
libxcursor-dev
libxinerama-dev
libgl1-mesa-dev
libglu1-mesa-dev
libasound2-dev
libpulse-dev
libudev-dev
libxi-dev
libxrandr-dev
libwayland-dev
sudo dnf install -y
scons
pkgconfig
libX11-devel
libXcursor-devel
libXrandr-devel
libXinerama-devel
libXi-devel
wayland-devel
mesa-libGL-devel
mesa-libGLU-devel
alsa-lib-devel
pulseaudio-libs-devel
libudev-devel
gcc-c++
libstdc++-static
libatomic-static
pkg install
py37-scons
pkgconf
xorg-libraries
libXcursor
libXrandr
libXi
xorgproto
libGLU
alsa-lib
pulseaudio
emerge --sync
emerge -an
dev-build/scons
x11-libs/libX11
x11-libs/libXcursor
x11-libs/libXinerama
x11-libs/libXi
dev-util/wayland-scanner
media-libs/mesa
media-libs/glu
media-libs/alsa-lib
media-sound/pulseaudio
sudo urpmi --auto
scons
task-c++-devel
wayland-devel
"pkgconfig(alsa)"
"pkgconfig(glu)"
"pkgconfig(libpulse)"
"pkgconfig(udev)"
"pkgconfig(x11)"
"pkgconfig(xcursor)"
"pkgconfig(xinerama)"
"pkgconfig(xi)"
"pkgconfig(xrandr)"
pkg_add
pkg-config
py37-scons
pkg_add
python
scons
llvm
sudo apt update
sudo apt install -y
python3-pip
build-essential
pkg-config
libx11-dev
libxcursor-dev
libxinerama-dev
libgl1-mesa-dev
libglu1-mesa-dev
libasound2-dev
libpulse-dev
libudev-dev
libxi-dev
libxrandr-dev
libwayland-dev
sudo pip install scons
sudo zypper install -y
scons
pkgconfig
libX11-devel
libXcursor-devel
libXrandr-devel
libXinerama-devel
libXi-devel
wayland-devel
Mesa-libGL-devel
alsa-devel
libpulse-devel
libudev-devel
gcc-c++
libGLU1
eopkg install -y
-c system.devel
scons
libxcursor-devel
libxinerama-devel
libxi-devel
libxrandr-devel
wayland-devel
mesalib-devel
libglu
alsa-lib-devel
pulseaudio-devel
Compiling
Start a terminal, go to the root dir of the engine source code and type:
scons platform=linuxbsd
If all goes well, the resulting binary executable will be placed in the "bin" subdirectory. This executable file contains the whole engine and runs without any dependencies. Executing it will bring up the Project Manager.
Running a headless/server build
To run in headless mode which provides editor functionality to export projects in an automated manner, use the normal build
scons platform=linuxbsd target=editor
And then use the --headless command line argument
./bin/Redot.linuxbsd.editor.x86_64 --headless
To compile a debug server build which can be used with
:ref:remote debugging tools <doc_command_line_tutorial>, use
scons platform=linuxbsd target=template_debug
To compile a server build which is optimized to run dedicated game servers, use
scons platform=linuxbsd target=template_release production=yes
Building export templates
To build Linux or *BSD export templates, run the build system with the following parameters:
- (32 bits)
scons platform=linuxbsd target=template_release arch=x86_32
scons platform=linuxbsd target=template_debug arch=x86_32
- (64 bits)
scons platform=linuxbsd target=template_release arch=x86_64
scons platform=linuxbsd target=template_debug arch=x86_64
Note that cross-compiling for the opposite bits (64/32) as your host platform is not always straight-forward and might need a chroot environment.
To create standard export templates, the resulting files in the bin/ folder
must be copied to:
$HOME/.local/share/Redot/export_templates/<version>/
and named like this (even for *BSD which is seen as "Linux/X11" by Redot):
linux_debug.arm32
linux_debug.arm64
linux_debug.x86_32
linux_debug.x86_64
linux_release.arm32
linux_release.arm64
linux_release.x86_32
linux_release.x86_64
However, if you are writing your custom modules or custom C++ code, you might instead want to configure your binaries as custom export templates here:
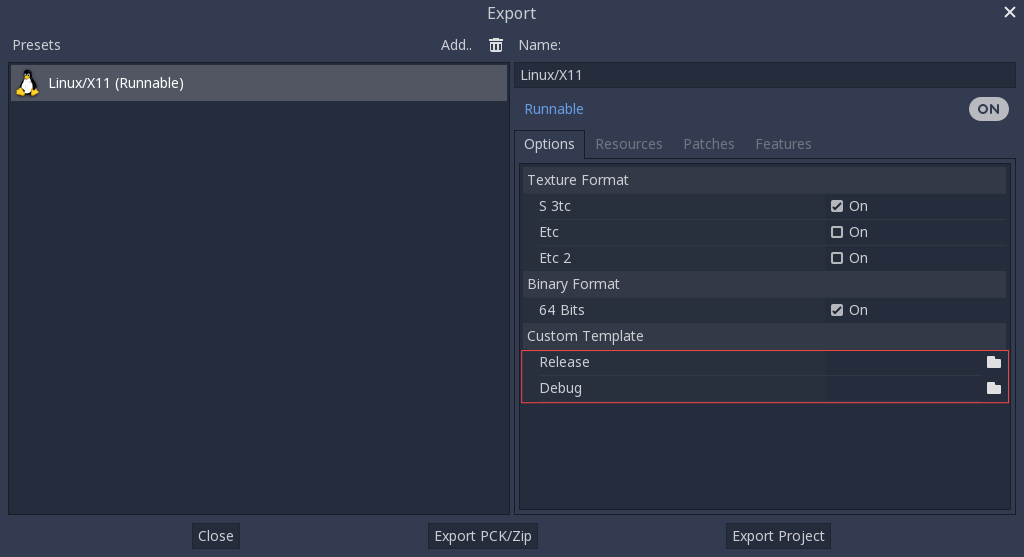
You don't even need to copy them, you can just reference the resulting
files in the bin/ directory of your Redot source folder, so the next
time you build, you automatically have the custom templates referenced.
Cross-compiling for RISC-V devices
To cross-compile Redot for RISC-V devices, we need to setup the following items:
- riscv-gnu-toolchain.
While we are not going to use this directly, it provides us with a sysroot, as well
as header and libraries files that we will need. There are many versions to choose
from, however, the older the toolchain, the more compatible our final binaries will be.
If in doubt, use this version,
and download
riscv64-glibc-ubuntu-18.04-nightly-2021.12.22-nightly.tar.gz. Extract it somewhere and remember its path. - mold. This fast linker,
is the only one that correctly links the resulting binary. Download it, extract it,
and make sure to add its
binfolder to your PATH. Runmold --help | grep supportto check if your version of Mold supports RISC-V. If you don't see RISC-V, your Mold may need to be updated.
To make referencing our toolchain easier, we can set an environment variable like this:
export RISCV_TOOLCHAIN_PATH="path to toolchain here"
This way, we won't have to manually set the directory location each time we want to reference it.
With all the above setup, we are now ready to build Redot.
Go to the root of the source code, and execute the following build command:
PATH="$RISCV_TOOLCHAIN_PATH/bin:$PATH" \
scons arch=rv64 use_llvm=yes linker=mold lto=none target=editor \
    ccflags="--sysroot=$RISCV_TOOLCHAIN_PATH/sysroot --gcc-toolchain=$RISCV_TOOLCHAIN_PATH -target riscv64-unknown-linux-gnu" \
    linkflags="--sysroot=$RISCV_TOOLCHAIN_PATH/sysroot --gcc-toolchain=$RISCV_TOOLCHAIN_PATH -target riscv64-unknown-linux-gnu"
The command is similar in nature, but with some key changes. ccflags and
linkflags append additional flags to the build. --sysroot points to
a folder simulating a Linux system, it contains all the headers, libraries,
and .so files Clang will use. --gcc-toolchain tells Clang where
the complete toolchain is, and -target riscv64-unknown-linux-gnu
indicates to Clang the target architecture, and OS we want to build for.
If all went well, you should now see a bin directory, and within it,
a binary similar to the following:
Redot.linuxbsd.editor.rv64.llvm
You can now copy this executable to your favorite RISC-V device, then launch it there by double-clicking, which should bring up the project manager.
If you later decide to compile the export templates, copy the above
build command but change the value of target to template_debug for
a debug build, or template_release for a release build.
Using Clang and LLD for faster development
You can also use Clang and LLD to build Redot. This has two upsides compared to the default GCC + GNU ld setup:
- LLD links Redot significantly faster compared to GNU ld or gold. This leads to faster iteration times.
- Clang tends to give more useful error messages compared to GCC.
To do so, install Clang and the lld package from your distribution's package manager
then use the following SCons command
scons platform=linuxbsd use_llvm=yes linker=lld
After the build is completed, a new binary with a .llvm suffix will be
created in the bin/ folder.
It's still recommended to use GCC for production builds as they can be compiled using link-time optimization, making the resulting binaries smaller and faster.
If this error occurs
/usr/bin/ld: cannot find -l:libatomic.a: No such file or directory
There are two solutions:
- In your SCons command, add the parameter
use_static_cpp=no. - Follow these instructions to configure, build, and
install
libatomic_ops. Then, copy/usr/lib/libatomic_ops.ato/usr/lib/libatomic.a, or create a soft link tolibatomic_opsby commandln -s /usr/lib/libatomic_ops.a /usr/lib/libatomic.a. The soft link can ensure the latestlibatomic_opswill be used without the need to copy it every time when it is updated.
Using mold for faster development
For even faster linking compared to LLD, you can use mold. mold can be used with either GCC or Clang.
As of January 2023, mold is not readily available in Linux distribution repositories, so you will have to install its binaries manually.
- Download mold binaries from its releases page.
- Extract the
.tar.gzfile, then move the extracted folder to a location such as.local/share/mold. - Add
$HOME/.local/share/mold/binto your user'sPATHenvironment variable. For example, you can add the following line at the end of your$HOME/.bash_profilefile:
PATH="$HOME/.local/share/mold/bin:$PATH"
- Open a new terminal (or run
source "$HOME/.bash_profile"), then use the following SCons command when compiling Redot
scons platform=linuxbsd linker=mold
Using system libraries for faster development
Redot bundles the source code of various third-party libraries. You can choose to use system versions of third-party libraries instead. This makes the Redot binary faster to link, as third-party libraries are dynamically linked. Therefore, they don't need to be statically linked every time you build the engine (even on small incremental changes).
However, not all Linux distributions have packages for third-party libraries available (or they may not be up-to-date).
Moving to system libraries can reduce linking times by several seconds on slow CPUs, but it requires manual testing depending on your Linux distribution. Also, you may not be able to use system libraries for everything due to bugs in the system library packages (or in the build system, as this feature is less tested).
To compile Redot with system libraries, install these dependencies on top of the ones listed in the Compiling For Linuxbsd Oneliners:
sudo apt-get update
sudo apt-get install -y
libembree-dev
libenet-dev
libfreetype-dev
libpng-dev
zlib1g-dev
libgraphite2-dev
libharfbuzz-dev
libogg-dev
libtheora-dev
libvorbis-dev
libwebp-dev
libmbedtls-dev
libminiupnpc-dev
libpcre2-dev
libzstd-dev
libsquish-dev
libicu-dev
sudo dnf install -y
embree-devel
enet-devel
glslang-devel
graphite2-devel
harfbuzz-devel
libicu-devel
libsquish-devel
libtheora-devel
libvorbis-devel
libwebp-devel
libzstd-devel
mbedtls-devel
miniupnpc-devel
After installing all required packages, use the following command to build Redot:
scons platform=linuxbsd builtin_embree=no builtin_enet=no builtin_freetype=no builtin_graphite=no builtin_harfbuzz=no builtin_libogg=no builtin_libpng=no builtin_libtheora=no builtin_libvorbis=no builtin_libwebp=no builtin_mbedtls=no builtin_miniupnpc=no builtin_pcre2=no builtin_zlib=no builtin_zstd=no
On Debian stable, you will need to remove builtin_embree=no as the system-provided
Embree version is too old to work with Redot's latest master branch
(which requires Embree 4).
You can view a list of all built-in libraries that have system alternatives by
running scons -h, then looking for options starting with builtin_.